Processing EDI
The Electronic Data Interchange (EDI) process of exporting, importing,
or doing both functions between two EBMS companies or between EBMS and
a 3rd party company can save data entry time and improve data intregrity.
Proper configuration and scheduling can automate the EDI process
of communicating purchase orders and other forms to suppliers and importing
sales orders from customers.
EBMS contains the following options to process EDI:
Launch process from EBMS documents
Configure and schedule process using the Task Scheduler App
Continue with the following instructions if the customer and vendor
configuration within each company data set that is communicating using
the EDI tool. Review EDI
Overview for vendor and customer configuration instructions.
A. Launch Process from EBMS Documents
- Open an existing purchase order or create a new order using one
of the following methods:
- Create a PO from the purchasing screen: Review [Inventory]
Purchasing > Inventory Purchasing Dialog on steps to create
a purchase order based on stock levels.
- Create a PO from special orders within sales orders: Review
[Inventory]
Special Orders and Drop Shipments > Purchasing Special Orders
to create a purchase order from a sales order.
- Create a PO manually: Review [Financials]
Purchase Order Overview for purchase order creation details.
- Select
option from the purchase order menu as shown below:

- The XML file will be created, converted to a sales order, and saved
within the Path of staging folder saved
within the vendor record associated with this purchase order.
- Close the purchase order dialog.
- Open EBMS with the purchase company data set and select from the main EBMS menu.
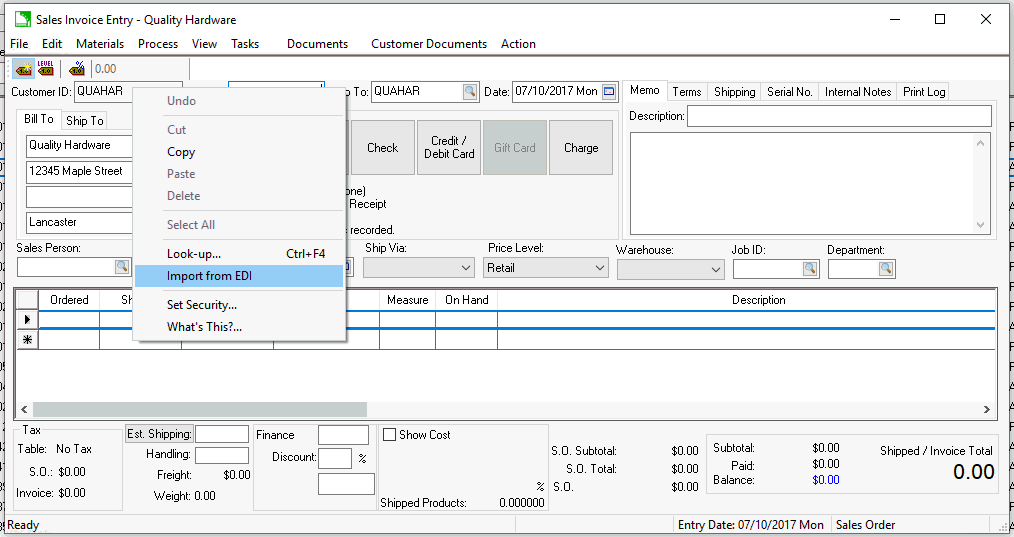
- Enter the Customer ID for the new order.
- Right click on the Customer ID and select
from the context menu as
shown below:
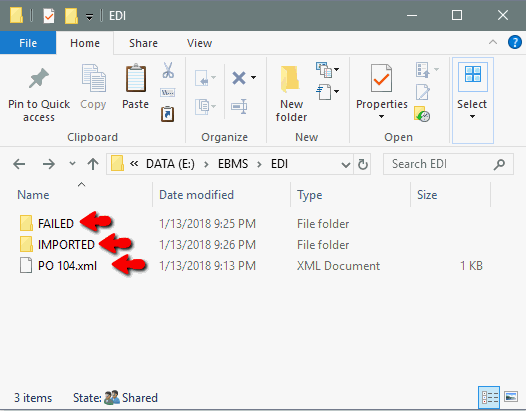
- XML files are copied to subdirectories based on the success of
the import.
B. Configure and Schedule Process using the Task Scheduler App
Scheduling the EDI imports or exports is a powerful to in creating a
seamless process to communicate data from one company to another. Use
the following URL settings within the Task Scheduler App.
Export
URL Format: ebms:dbscript?UserName=administrator&Password=&DataPath=C:\\Shared\\MyDataset&ShowUI=true&command=ExportDocToEdi&p1=doc_type=S&p2=doc_id=12345
doc_type:
- S for Sales Order
- P for Purchase Order
doc_id: the key field value for the document
such as an invoice number
Import
URL Format: ebms:dbscript?UserName=administrator&Password=&DataPath=C:\\Shared\\MyDataset&ShowUI=true&command=ImportFromEdi&p1=doc_type=S&p2=id=BUSAME&p3=action=2
doc_type:
- S for Sales Order
- P for Purchase Order
ID: EBMS vendor or customer id
Action:
- 1 for retrieve
- 2 for import
- 3 for both retrieve and import
Review Automate using
Task Scheduler App for instructions to schedule the activation of
either URL using the Windows scheduler.